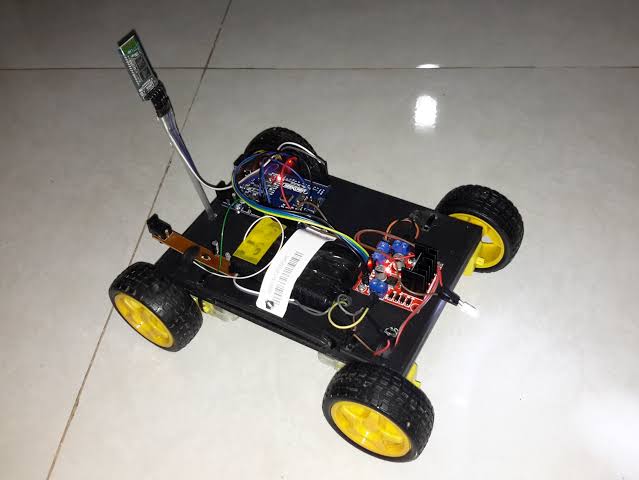
An Arduino-based UHD (Ultra High Definition) Bluetooth car project can be understood as creating a remote-controlled car using an Arduino board, a Bluetooth module, and potentially some advanced components such as HD cameras or sensors for enhanced functionality. Here’s a step-by-step guide to building a basic Arduino Bluetooth-controlled car with optional features like a camera or sensors to make it more interactive.
Key Components Required
- Arduino Board (e.g., Arduino Uno or Nano): Acts as the main controller for your car.
- Bluetooth Module (HC-05 or HC-06): For wireless communication between your Arduino and the controlling device (e.g., smartphone).
- Motor Driver (L298N or L293D): To control the motors for movement (forward, backward, left, right).
- DC Motors (2 or 4 motors depending on the chassis): For driving the car.
- Wheels and Chassis: The physical body and wheels to build the car.
- Power Supply (Battery pack or LiPo battery): Powers the Arduino, Bluetooth module, motor driver, and motors.
- Smartphone or Bluetooth-enabled device: Used to control the car via a Bluetooth app or custom app.
- Camera (optional): For UHD video streaming (if you want a live video feed).
- Camera Module (optional): For HD streaming, a module like the ESP32-CAM could be used.
- Additional sensors (optional): Ultrasonic sensors for obstacle detection or gyroscope for stability.
Step-by-Step Guide to Building an Arduino Bluetooth Car
Step 1: Assemble the Chassis
Start by assembling the chassis of the car. You will need to attach the DC motors to the chassis and fix the wheels in place. This can be done by simply following the instructions provided with the motor kit or chassis.
Step 2: Wiring the Motors
To control the direction and speed of the motors, connect the motor driver (such as L298N) to the motors and Arduino. Here’s how:
- Connect the motors to the motor driver outputs (usually labeled as Out1, Out2 for one motor and Out3, Out4 for the other motor).
- Connect the motor driver’s input pins to the Arduino pins. For example:
- Motor 1 (IN1, IN2)
- Motor 2 (IN3, IN4)
- Enable pins for controlling speed (can be connected to PWM pins for speed control).
Step 3: Wiring the Bluetooth Module
Connect the Bluetooth module (HC-05 or HC-06) to the Arduino as follows:
- VCC to 5V on the Arduino.
- GND to GND.
- TX (Transmit) pin on Bluetooth to the RX (Receive) pin on the Arduino.
- RX (Receive) pin on Bluetooth to the TX (Transmit) pin on the Arduino.
The Bluetooth module will allow your Arduino to receive commands from your smartphone or Bluetooth-enabled device.
Step 4: Powering the System
Power the system with a suitable power supply. A battery pack (6V or 7.4V) or LiPo battery can be used to provide power to both the Arduino and the motor driver. Make sure that the motor driver is capable of handling the voltage and current requirements of the motors.
Step 5: Writing the Arduino Code
The Arduino code will handle the logic of controlling the motors based on Bluetooth commands. Here’s a basic example code for controlling the car using the HC-05 Bluetooth module:
// Define motor control pins
const int motor1A = 3; // Motor 1 forward
const int motor1B = 4; // Motor 1 backward
const int motor2A = 5; // Motor 2 forward
const int motor2B = 6; // Motor 2 backward

void setup() {
  // Set motor control pins as output
  pinMode(motor1A, OUTPUT);
  pinMode(motor1B, OUTPUT);
  pinMode(motor2A, OUTPUT);
  pinMode(motor2B, OUTPUT);

  // Start Bluetooth communication
  Serial.begin(9600);
}

void loop() {
  if (Serial.available() > 0) {
    char command = Serial.read();  // Read the Bluetooth command

    if (command == 'F') {  // Move Forward
      digitalWrite(motor1A, HIGH);
      digitalWrite(motor1B, LOW);
      digitalWrite(motor2A, HIGH);
      digitalWrite(motor2B, LOW);
    }
    else if (command == 'B') {  // Move Backward
      digitalWrite(motor1A, LOW);
      digitalWrite(motor1B, HIGH);
      digitalWrite(motor2A, LOW);
      digitalWrite(motor2B, HIGH);
    }
    else if (command == 'L') {  // Turn Left
      digitalWrite(motor1A, LOW);
      digitalWrite(motor1B, HIGH);
      digitalWrite(motor2A, HIGH);
      digitalWrite(motor2B, LOW);
    }
    else if (command == 'R') {  // Turn Right
      digitalWrite(motor1A, HIGH);
      digitalWrite(motor1B, LOW);
      digitalWrite(motor2A, LOW);
      digitalWrite(motor2B, HIGH);
    }
    else if (command == 'S') {  // Stop
      digitalWrite(motor1A, LOW);
      digitalWrite(motor1B, LOW);
      digitalWrite(motor2A, LOW);
      digitalWrite(motor2B, LOW);
    }
  }
}
This simple code reads commands from the Bluetooth module and translates them into motor actions:
- ‘F’: Move forward
- ‘B’: Move backward
- ‘L’: Turn left
- ‘R’: Turn right
- ‘S’: Stop
Step 6: Controlling the Car via Bluetooth
To control the car, you’ll need a smartphone app or a Bluetooth terminal app. For Android, you can use apps like Bluetooth Terminal or create a custom app using MIT App Inventor. These apps allow you to send commands to the Arduino via Bluetooth (e.g., sending ‘F’, ‘B’, ‘L’, or ‘R’).
Alternatively, you can use Arduino Bluetooth Car Control apps, which provide a graphical interface for controlling the car’s movement.
Step 7: Adding Optional Features (UHD Camera or Sensors)
- UHD Camera (Optional): To add a UHD camera for streaming video, use a camera module like the ESP32-CAM. This module can stream video over Wi-Fi to your smartphone. You’ll need to write code to configure the camera and send video data over a network.
- Ultrasonic Sensors (Optional): For obstacle detection, add ultrasonic sensors to the car to make it aware of its surroundings. Sensors like the HC-SR04 can be used to measure distance and avoid collisions.
- Gyroscope (Optional): For better stability and control, a gyroscope sensor like the MPU6050 can be added to help maintain the car’s balance and make more sophisticated movements.
Step 8: Final Testing
Once everything is connected, upload the Arduino code, pair your Bluetooth device with the HC-05, and test the car’s movement. You can fine-tune the motor controls, adjust sensor ranges, or modify the code to add additional functionalities.
Conclusion
Building an Arduino Bluetooth car is a fun and educational project that introduces you to basic robotics, wireless communication, and mobile app integration. You can expand on this project by adding cameras for live streaming, ultrasonic sensors for navigation, and more. With careful wiring, programming, and testing, you can create a fully functioning remote-controlled car that responds to Bluetooth commands, and even integrate advanced features like UHD video streaming or obstacle avoidance.
Leave a Reply